Bridge - The Scotsman 04/05/13


The support double has advantages, but here, when East redoubled to show three-card spade support, South was able to introduce his diamonds. West bid 3NT with his
double stopper, and North led the four of diamonds. Dummy’s ten scored at trick one. How would you plan the play? North appears to have both king and jack of diamonds. If he gains the lead he cannot attack diamonds without conceding a third trick in the suit.
Advertisement
Hide AdAdvertisement
Hide AdYou should play a suit where he has the ace to establish winners without letting in South. At the table declarer chose to play on clubs, first establishing his longer suit. South won and played a diamond to the queen and king. North returned the jack of diamonds and the defenders beat the contract with three diamond tricks and three aces. Note the difference if declarer tackles another suit first. Say he runs the jack of spades. If North takes the ace declarer has three spade tricks.
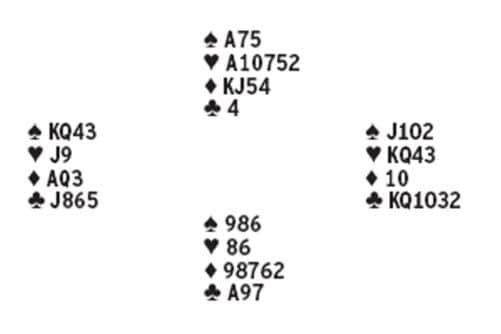
Another diamond is ineffective, so North might lead a club to partner’s ace. But that establishes four club tricks to go with three spades and two diamonds, and the game makes. If instead North twice ducks the ace of spades, declarer can switch his attention to hearts.
Once he has made three tricks in the majors it is safe to play clubs.
It is unusual to play first on a shorter suit, but the contract is at risk only if South gains the lead early, and the ace he is most likely to hold on this bidding is the ace of clubs. Of course, North beats 3NT out of hand by leading a diamond honour to pin dummy’s ten. Now it does not matter who gains the lead – either player can grab his ace at the first opportunity and play diamonds.